How to program AVR microcontrollers (ATmega8, ATmega328p, ATtiny13, ATtiny84 ...) on Linux operating system (OpenSuse Leap 15.2)
AVR microcontroller programming on Linux
In this post I will show you how to program AVR microcontrollers (uC) in Linux. How to setup softwares and hardwares. It is very easy to program we only need a cheap uC chip in DIP package, a programmer, couple of wires, resistors and a breadboard. I will show you how to program the chip in C language with Linux's Console application and a text editing software called 'Kate'.
Setup hardware and software
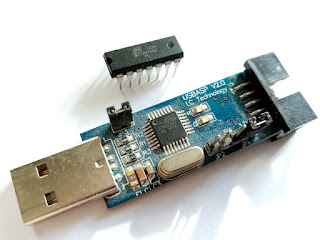
1. We need a programmer for example an USBasp programmer. I think we can also use a USBtiny programmer, but I don't have any experience with that.

usbasp programmer
More information about USBasp programmer (Schematic diagram and firmware) here: https://www.fischl.de/usbasp/
- avr-libc
- avrdude
- cross-avr-binutils
- cross-avr-gcc7
repository for OpenSuse Leap 15.2:
repository for OpenSuse Leap 15.3: https://download.opensuse.org/repositories/CrossToolchain:/avr/openSUSE_Leap_15.3/

How to install software packages
1. Adding the software repository
Open YAST Software Repositories tool.

Click 'Add'

Click 'Next'
- paste the link to the 'URL'

Click 'Next'

Wait for install ...

Click 'OK'
2. Installing packages
Start YAST Software Management tool and in the search box just type 'avr' click 'Search' and then from the list select these 4 packages:

Click 'Accept' and wait for install.
After that the softwares are ready.
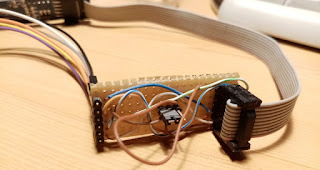
USBasp Pinout

I made this cable assembly to connect the 10 pin IDC cable to 6 pin AVR ISP cable.


Programming an ATtiny84A microcontroller
1. Connecting programmer to microcontroller
First we have to connect the 6 programming cables to the IC. We do it through a breadboard.

So orange cable to VCC (pin 1), black cable to GND (pin 14), grey cable to RESET (pin 4), purple cable to MOSI (pin 7), yellow cable to MISO (pin 8) and white cable to USCK (pin 9). Reset pin of the microcontroller has to be pulled high to 5V with a 10k resistor. If we attach a push button switch to the reset pin we can reset the uC.

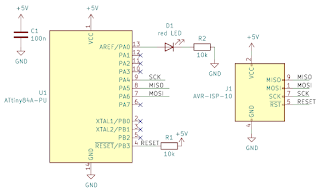
schematic diagram
2. Making the executable files
- Make a work Folder where you put everything into. We save the following files also in this folder.
- Next open 'Kate' text editing software.
1. Testing the uC: copy and paste the following text in a new file and save it under "test":
avrdude -c usbasp -p t84 -B 500
2. Compiling program: copy and paste the following text in a new file and save it under "compile":
avr-g++ -g -Os -Wall -mcall-prologues -mmcu=attiny84 -fno-exceptions -o main_t84.obj main_t84.c
3. Uploading the hex file to the uC: copy and paste the following text in a new file and save it under "upload":
avr-g++ -g -Os -Wall -mcall-prologues -mmcu=attiny84 -fno-exceptions -o main_t84.obj main_t84.c
avr-objcopy -R .eeprom -O ihex main_t84.obj main_t84.hex
avrdude -c usbasp -p t84 -B 141 -U flash:w:main_t84.hex
After that we have to make these text files executable, so we can run these in the Terminal. Go into the folder and right click 'test', click 'Properties' then at the top of the new window click the 'Permissions' tab then in the middle click the checkbox 'Executable' and click 'OK'. Make these steps with the other two files also.
3. Writing our first program
- This program is the 'Hello world!' program for microcontrollers, the blinking LED program. We will toggle the first bit of PORTA so PA0 at a frequency of 1 Hz, thus the LED will blink once every second.
- In 'Kate' create a new file and save it in the folder under the name 'main_t84.c'.
- Copy and paste the following program code into the file, then save it.
The code:
#include <avr/io.h> //main include file for avr uC-s, it has to be in all programs
#define F_CPU 1000000UL //frequency of the cpu is 1 MHz. You have to put "UL" after the frequency number to tell the compiler it is a long int
#include <util/delay.h> //include for _delay_ms() function. This line always has to be after the define of the CPU frequency!
void setup_io( void );
int main( void )
{
setup_io();
while(1)
{
PORTA |= (1 << PA0);
_delay_ms(500);
PORTA &= ~(1 << PA0);
_delay_ms(500);
}
return 0;
}
void setup_io()
{
DDRA |= (1 << PA0);
PORTA &= ~(1 << PA0);
}
4. Connect USBasp programmer to the usb port of your computer

5. Uploading the hex file to the microcontroller
Open the Terminal and navigate to the folder where your files are. My folder is named 'ATtiny84'. You can also use the embedded Terminal of Kate. Type ./test and hit Enter.

Then type ./compile and hit Enter.

And finally type ./upload and hit Enter.

Youtube video:


Comments
Post a Comment